How To Create A Help File


                                            What is a HELP file?                    
                                    
                                A            help file            is one of a software's component which contains the documentation on how the features of a software program works. The purpose of having a help file is to guide users on how they will understand the use of the program by providing them answers to some FAQ's (frequently asked questions).          
                      
                                Where to find it?                    
                                    
                                Ahelp filein most windows application is found under            Help menu            of the program's main menu strip found below the window's title. The standard shortcut key to press assigned for this component is              F1.          
                      
                    So how important it is to have a help file?          
                      
                    A software without ahelp fileis not a good product because it does not care for its users. Nobody in this world is born to know how to use the spoon and fork without learning it from someone like our mother. So, including a help file in a software program you develop will be a big help for the users to easily understand on how to use it.          
          ..................................................................................................................................................        
                                In this article, I will teach you the step by step instruction on             how to create a help file            using the Microsoft              HTML Help Workshop, a chm file compiler. Let's get started!                    
                                    
                                                          Step 1.              Download              HTML Help Workshop here.                    


                                Step 2.                    Install          HTML Help Workshop.          


                    Step 3.                    Go to windows            start menu, click            programs            and locate for            HTML Help Workshop            folder. Expand the folder and click            HTML Help Workshop            to start the application.          


Step 4. Click File > New and select Project from the listto create new chm project. Click OK to start.


                    Step 5.          ClickNext            to proceed.          


                    Step 6.          Click            Browseto specify your project title and location in your local directory. I recommend you to create a new folder where your project will be saved and name it like 'Help file' and name the project file name as 'help'.Then click            Next            to proceed.          


                    Step 7.          ClickNextto proceed.          


                    Step 8.                    Then click            Finish            to create the new project.          


                    Step 9.          Now we can begin to fill the content of the help file. Go to            Contents            tab and select            Create a new contents file            on the contents pop up window, then click            OK. Name the content file as 'help content' and click            Save.                    
                                    
                                            Note:            Save the content file            help content.hhc            in the same folder where you saved your            Helpproject.          


                    Step 10.          To begin adding contents, we start by naming your first Heading folder. Click the Insert a Heading folder              icon            on the left panel under            Contents            tab. Type the Entity Title of the first Heading and click            OK.          


                    Step 11.                    Before you add a sibling under your first heading, you might consider first to create an HTML file content of that sibling. Go to            File            >            New                    and select          HTML file          from the list                    to create new html file. Click          OK          to proceed          


          .          
          Step 12.          Name the title of your first html file as            welcome            then click              OK.          


                    Step 13.                      In creating the html file, you need to at least know the basics on how to write code for html file. But for the purpose of this tutorial, you may copy this 3 html lines and paste it after the <BODY> tag.                    
                                            <h2>Welcome to 'software product name here'</h2>                    
                                                          </br>                                
                                                          <p>'software product name here' is bla bla bla</p>                                
          After that, go to            File            > clickSave File As. On the same root folder of your project save the new html file by naming it 'welcome.html'.          


          Step 14.                      Back to your              Contents              tab, select your first heading then c                    lick the Insert a Page          icon                       on the left panel. A message box will appear and ask if you want to place the page at the beginning of the content page, just click                                NO                      .                    


                                Step 15.                      On the Table of Contents Entry window, enter your entity title as 'Welcome', click              Add              then browse for the                              welcome.html                            file you created earlier. Click              OK              and click again              OK.                  


                    Step 16.                      Now we stop here but you may insert more headings and pages of your Contents tab. We will proceed on how to compile the project.                    
                                    
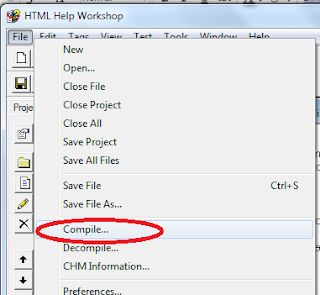
                                            OK. To compile your first project, go to              File              >              Compile.                    


                                            The project file name extension is always              .hhp. To find your              .hhp              file, click              Browse ,go to the root folder where you saved your project and find for              help.hhp              and click              Open.                    
                      On the Create a compiled file window, click              Compile              to start compiling the project.                    


                                             After the compilation process, you should see result like this.                    


                                Step 17.                      Finally, to open your compiled chm              Help File, go to your root folder directory where you saved your project and open the file              help              with a question mark icon. see image below.                    


                                            Thank you for patiently following these 15 steps on              how to create a help file. I hope you made the same output just like what I have shown you.                    


How To Create A Help File
Source: http://tutlogger.blogspot.com/2015/07/how-to-create-help-file.html
Posted by: ryanreephy.blogspot.com

0 Response to "How To Create A Help File"
Post a Comment