

How To Draw Anime Hands
If there'south 1 nightmare that all graphic symbol artists share, information technology's drawing hands. Fifty-fifty if yous're a manga artist and you tend to simplify all body parts for stylization purposes, hands can't actually be simplified that much. Later all, it's non the details that brand them difficult to draw—information technology'due south their flexibility. They're like a character of their ain!
In this tutorial, I will show you how to draw anime hands past explaining the beefcake and structure backside them. I'll show you how to simplify the rhythm of the hands, how to first the cartoon, and how to go on the proportions correct. I'll too show you how to describe the feet, which are another problematic issue for many artists. If you desire to keep things unproblematic, I'll show you how to draw hands and feet stride past stride as well.
This is role three of our series, How to Draw Anime. If you're interested in drawing manga in general, y'all may want to check these out, also:
1. The Anatomy of Anime Easily
Anime easily, though so smooth and simple, share their basic structure with existent hands. If you understand this structure properly, everything will be easier for you! Permit's start with the bones.
As you can see, the fingers are longer than they announced. They're "buried" inside the palm, which makes this role less flexible. That's why for practical reasons it's better to see fingers as starting where the palm ends. The thumb is an exception here—it's far away from the remainder and can move on its own, not being limited by the palm.
Each finger has three joints. The sections between them go progressively shorter. The thumb once again is an exception—it just has ii joints, and its bones are similar in length.


Of course, we don't actually need to know the bones—we need to know their role and how they affect the look of the manus. The simplified structure of the mitt consists of:
- the heads of the forearm bones (in the shape of a broad wristband)
- the wrist (in the shape of an ellipsoid)
- the palm (in a complex shape that nosotros will hash out in a moment)
- the thumb base (in the shape of an ellipsoid)
- four three-segmented fingers
- one 2-segmented pollex
Information technology'south very of import to memorize this fan-shape rhythm betwixt the joints. It influences the look of the hand, regardless of the pose of each finger. Information technology makes it easier to guess the position of each joint in relation to the others, even the pollex's.


But the surprising thing is that the fingers don't really differ that much in length. If you remove the fan rhythm and place the phalanges (the finger bones) next, you won't see that much of a departure. That's why, instead of memorizing the length of each finger'due south phalanges, you just need to remember the relation between them—the modify in position as defined by the rhythm of a fan.


Proportions of Anime Hand
There are certain proportions that y'all demand to know to draw a right manus. Yous don't need to be strict about them, but keep them in mind and try to follow them.
Kickoff, the length of the alphabetize finger is roughly equal to the whole palm (along with the wrist joint hidden in its base).


The ideal proportion of the joints on the index finger is: a half for the second joint, so over again a half for the third. However, in reality, the 2d joint often lies at about 40% of the finger'due south length. Feel gratuitous to chose the proportion that yous like more—in stylized anime easily, the difference shouldn't be that visible!


The pollex is as long as or slightly shorter than the lilliputian finger, but for me it's best measured through its relation to the first finger—the pollex's tip doesn't reach its 2nd joint.


two. How to Draw a Paw the Simple Way
But knowing the proportions of an anime paw is just 1 affair. How to beginning a cartoon is another. Let's simplify what you lot already know to larn how to draw a proportional paw from scratch.
Step 1
Y'all can simplify the wrist to an oval and the palm to a bigger oval. When you lot draw it this way, yous tin easily rotate the manus at the wrist, imagining it equally a ball.


Step two
Add an oval for the base of the thumb. To go along it proportional, go far slightly longer than half of the palm.


You need to remember that the thumb is non really a function of the palm, from a functional perspective. You need to imagine the whole mitt three-dimensionally, not like a apartment plane.


Step three
The palm itself has an interesting form. Place your manus on a flat surface in a relaxed way. You lot'll notice that only the niggling finger and the thumb rest on the surface, while the others hang in the air. The palm isn't really flat, unless you spread the fingers on purpose.


So we have two issues here:
- The palm must exist curved.
- The palm must accept the fan rhythm on meridian.
These together create a very circuitous form—something hard to imagine, allow alone draw! But there's a solution to this problem. We can group the finger in two pairs and connect each pair to a split up ellipsoid—just like the one the thumb is attached to. If you make one pair smaller (ring finger, pinkie) and put it lower, you lot'll go the shape we need!


Still confused? Let's describe it in 2D. Start 1, longer oval...


... then a second, shorter oval. They should both beginning in a similar place, and spread slightly to the sides like an asymmetrical heart.


Stride 4
You lot should have no bug with applying the fan rhythm now, and the fingers just accept to follow it.


Hither's the whole simplified construction of the mitt for your reference.


Step five
Ane more matter: the fan rhythm is not an accident. The fingers can go together, creating the shape of a mitten.


This apartment mitten can exist useful in some poses. Instead of drawing separate fingers, you can draw them together as one shape.


3. Details of the Mitt
But proportions and shapes are not everything—without details, information technology'south just a skeletal hand. Let'south run into what else we can add to our hands.
Details of the Palm
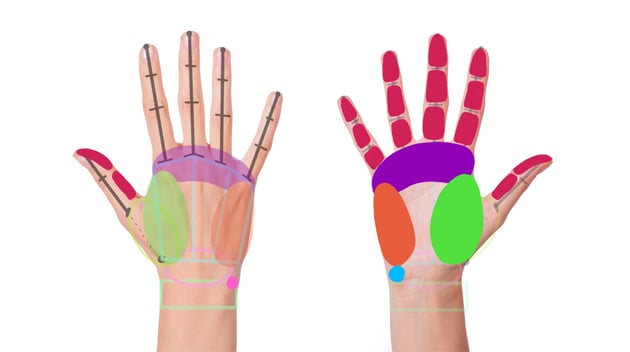
Easily are not simply bones—they also have muscles and fat. These elements are mostly important on the palm side. Wait at your own hand to locate these parts:
- Each phalanx has a fat absorber underneath. This makes the fingers wait curved below (in contrast to the apartment, bony top).
- All the fingers have a large cushion right on the base of operations. Information technology lies correct under the big joint and covers a function of the commencement phalanx. Because of information technology, the fingers look shorter on the palm side, but just curve them to come across where the bone really starts.
- There are two cushions on the sides of the palm—1 for the pollex, and one for the lilliputian finger. Because of them, in that location appears to be a hollow in the center of the palm.
- Although the wrist bones seem to be buried inside the manus, there's ane bone that sticks out (pisiform). You lot can feel and run into it under the little finger'south cushion.
- A similar bony protrusion tin can exist felt on the other side. It'south the hand of the radius, the forearm bone. It sits slightly lower than the pisiform.


How to Describe Fingers
Permit's learn how to draw the shape of the fingers now.
Footstep 1
Draw a big circumvolve at the base of the finger.


Pace 2
Draw a smaller circle at the second articulation. Connect it to the start 1. These lines should taper a piddling. Also, if you draw the bottom of the phalanx, remember to add a bend.


Footstep three
Drawn an even smaller circumvolve at the last articulation. Connect information technology to the previous one. This phalanx doesn't accept a lot of absorber, so the curve only appears if the finger is bent.


Footstep 4
Draw the tip of the finger in the shape of a smooth wedge. Avoid completely pointed tips, unless you're cartoon your graphic symbol in a deformed style.
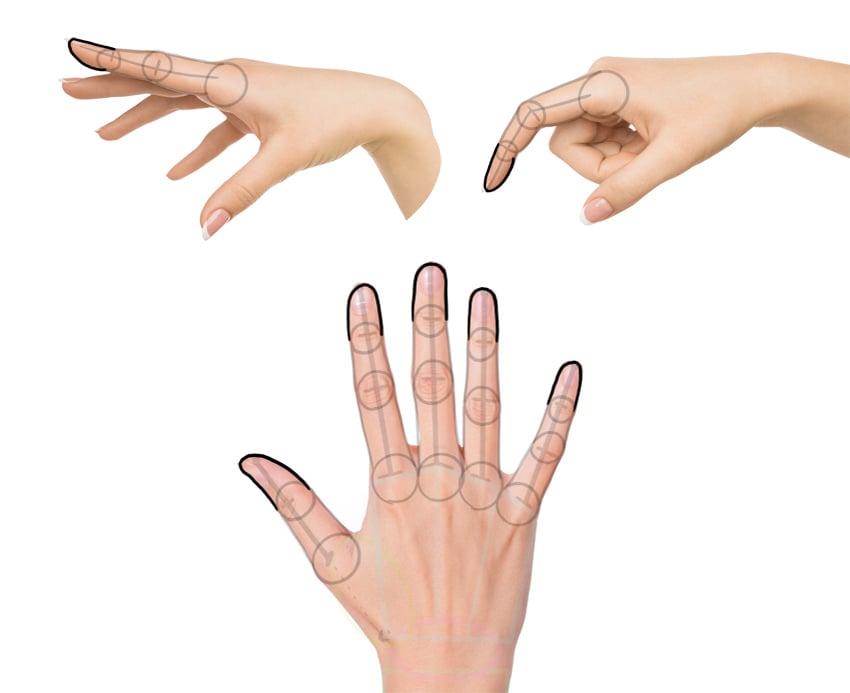


Footstep 5
Add the nails at the halfway point of the final phalanx. They should exist very subtle—their outline can't compete with the more of import outline of the whole hand.


Step 6
Don't forget about webbing betwixt the fingers!


iv. How to Draw Anime Hands Pace by Pace
Enough theory! Allow'south run across how to draw anime hands in every pose! For this exercise, it's proficient to employ a reference. In fact, to learn how to draw hands, you need to practice a lot—not from imagination and guessing, but past analysis of the real thing. This constant exposure to the structure of a real hand will help you lot develop an intuition, and you'll showtime "feeling" the difference between a correct pose and an incorrect ane.
Hither I used this photo of various mitt poses from Envato Elements.
Step 1
Start by cartoon the basic rhythm of the paw. Information technology doesn't matter which finger you choose for this line of action—choose the i that seems to be the most important in the pose.


Step 2
Sketch the palm, for now only as a rounded box. Call up nigh its basic perspective, but ignore the curving and the fan rhythm for now.


Footstep 3
Add the base of the thumb. Adapt its length to the length of the palm.


Footstep four
Add together the oval base for the first finger and the alphabetize finger. It should tilt slightly towards the pollex, and information technology should be quite long.


Step 5
Add the base for the ring finger and the little finger. It should tilt abroad from the previous base of operations. It should also be shorter and placed lower.


Footstep half-dozen
Marking the fan rhythm to come across where the finger should start.


Step 7
Sketch the rhythm of the fingers. Remember to use the proper length for each. You don't have to measure anything—simply make sure that the index finger looks similar in length to the palm with the wrist.


Step 8
Marker all the joints past copying the rhythm of the fan.


Pace 9
Add the masses now. Find how the cushions get squished in some poses.


Step 10
Depict the shape of the fingers now. Information technology'southward my favorite office because it's when the mitt starts looking like one!


Step 11
Add the "wristband" and the bony protrusions below the pinkie.


Step 12
Add the webbing betwixt the fingers and create an outline betwixt the elements.


Stride 13
Draw the final lines. Call back not to outline everything—the hands should be simply every bit detailed as the rest of your character. Otherwise, they won't look consistent.


5. The Anatomy of Anime Feet
Whew, that was intense! Luckily, feet are not as complex equally easily. They're congenital for stability, so they don't change shape that much. But if yous have a closer look at the bones, yous'll see the same ones as in the paw—which explains why in my language (Polish) and in many others, the toes are simply called fingers.


Structure of an Anime Foot
Nosotros can simplify the foot but every bit we did with the mitt. The primary difference here is that there'southward a huge bone in the back, the heel, which acts similar the pisiform in the manus. Also, the "fingers" are much shorter than the "palm" here.


Proportions of an Anime Foot
Information technology's quite easy to make a human foot look proportional. The whole pes is about four big toes long. The "palm" is less than ii big toes long. The other toes share the fan rhythm you're already familiar with. Detect that the large toe, just like the pollex, has only two joints!


The Sole of the Foot
There are too of import details on the bottom side of the foot:
- Each toe has a big cushion under the final phalanx.
- There's a big cushion under the base of the toe.
- There'southward a big cushion under the heel.
- The foot doesn't impact the ground on its whole surface—but this orange curved expanse does.


6. How to Draw Anime Feet in Perspective
Allow's take a closer look at the 3D forms building the feet.
Step one
Most of the foot can exist simplified to trivial rounded "shoes", or a h2o balloon. This form includes both the heel and the rounding on summit of the foot. We can draw it this way, because this area doesn't actually change shape that much.


Pace two
The trouble is that the pes isn't uniformly flat on peak. Just like the paw, it curves downwards towards the smallest toe. Then after you lot draw this big shoe-shape, you lot need to flatten 1 of its sides. Take a wait at your own anxiety to empathize it better.


Pace 3
The beginning articulation of each toe starts here. This is also where the fan rhythm appears for the kickoff time.


Step 4
This is where the longest phalanges start. They have a very simple, blocky shape.


Footstep v
It'south good to depict the last phalanges at one time later this. Why? Because the cushions under them reach back a little, landing right under the eye phalanx, which, equally you'll larn next, has a curious shape.


Step 6
The heart phalanx drops downward towards the last i. The smaller the toe, the more visible the bending.


Footstep 7
Although manga style ignores many details, sometimes you may want to add the talocrural joint bones, likewise. They're visible on the sides of the ankle, just they're asymmetrical—higher on the inner side.


Stride eight
While outlining the forms, remember to create an indentation on the inner side of the foot. If y'all don't know why information technology'southward necessary, go back to the part where nosotros were analyzing the sole of the human foot—or just take a expect at your own!


Step ix
Knowing all of this, you can simplify any foot to a set of basic lines that are perfect to start a drawing:


seven. How to Draw Anime Feet Pace by Stride
This theory is all yous need to showtime drawing! As earlier, we still need some references to learn how to create believable poses. I used this photograph of anxiety in various views.
Footstep one
Starting time with a basic rhythm of the human foot. Ignore the heel for at present.


Pace two
Add the heel now, just like a simple line at a stock-still angle.


Step 3
Add the ankle area as a simple sphere.


Step 4
Add the "shoes"/"water balloons" under the ankle. You should come across it clearly on the reference photo.


Footstep 5
Mark the top of the pes, forth with its tilted side.


Step vi
Add together the first row of toe joints. Make them big and round. Information technology's not always necessary to draw all of them if they're obscured by each other.


Step 7
You can get two ways now: draw the terminal phalanges along with the cushion, or draw the middle one with this pull a fast one on:


Step 8
The last phalanx is quite easy to draw! Simply follow the rhythm.


Footstep 9
Don't forget the details of the sole.


Pace 10
Add the "wristband" of the ankle to connect the foot to the rest of the leg.


Step 11
Outline the foot, keeping simply as many details as y'all demand.


Well, That Was Handy!
Now yous know how to draw anime hands and anxiety! Think, even if information technology looks difficult now, with regular practice it will go second nature. And your characters won't have to hibernate their hands or anxiety anymore! If you want to practice on the same photos I used in this tutorial, hither'due south a list of them:
- Human foot in a side view
- Feet in diverse views and poses
- The soles of the feet
- An RTG photograph of a mitt
- "Open" hands
- "Airtight" hands
- Top view of a hand
- Lesser view of a hand
- A set of hands in diverse views and poses
If you like stylized drawing like manga, you may also exist interested in our serial How to Draw similar Disney:
And if you liked the deconstruction-based format of this tutorial, yous may as well like my series on how to depict the parts of the face:


Source: https://design.tutsplus.com/tutorials/how-to-draw-anime-hands-and-feet--cms-31925
Posted by: ryanreephy.blogspot.com
0 Response to "How To Draw Anime Hands"
Post a Comment